Knowledgebase

Black Screen after upgrade


If you see the black screen only after sign-in and you can see a mouse cursor:

  1. While at the black screen, try using CTRL+SHIFT+ESC to start Task Manager.
  2. If it becomes visible, try finding LockAppHost.exe on the Details tab and ending the task.
    1. If this resolves the black screen, use corruption resolution steps (dism, then sfc), and run the all apps PowerShell command in 3080495.
  3. If this does not work, then Explorer.exe probably crashed. you can start Internet Explorer to achieve an LMI connection to then perform some other troubleshooting:
    1. In Task Manager, File, Run. iexplore.exe
    2. Once you achieve a connection you can use a few tools started from Task Manager to make progress:
    3. Appwiz.cpl: Look for Antivirus software or other apps that may cause issues with the shell. Uninstall them. Then restart.
    4. Compmgmt.msc: This is Computer Management, where you can find the Event Viewer to search for details on an Explorer.exe error.
    5. CMD started as Admin: Use this for various commands, like creating a new administrator user with the following commands (changing “<password>” to something of the customer’s choosing):
         net user test <password> /add
         net localgroup Administrators test /add
      This will give you a test user to try, which will confirm if the issue is user or system-specific.

If you see the black screen or have a flickering screen before sign-in:

  1. Try connecting to different video outputs on the PC. Sometimes a change in driver can cause the video to be sent:
    • To a different Adapter: from integrated graphics to a discrete card or vice versa.
    • To a different output: from HDMI to DVI, DisplayPort to VGA, or any other combination.
  2. Try to boot into Safe Mode with Networking or Enable low-resolution video.
    1. Advanced boot options, Safe Mode with Networking, or Low Resolution Video
    2. Check Device Manager and look for Display Adapters
      • If you see 2 items under Display Adapters, disable the integrated video card (e.g. Intel HD 4000 or AMD Radeon HD 4200) and restart. (try vice versa if it does not work)
      • If you see 1 item under Display Adapters, rollback the driver or uninstall the display adapter in Device Manager, and enable the option to delete driver software.

Check the PC or display adapter manufacturer’s site for an updated driver.

Cortana: “Disabled by Company Policy” error. 


As a workaround that you can offer to the customer, you may try to add the speech language for English United States.

To do so:

  1. Open the Time & Language Settings page
  2. Make sure that English (United States) is listed.  If not, click on “Add a language”, and follow the steps to add the language
  3. Click on “English (United States)”, then click on the “Options” button.
  4. You should now have an option to download the speech file as shown below


  5 .Set the Country and region setting to the United States. Log off and log in.

Flickering Screen after Signing in


If we see the screen flickering after sign-in there are two possible causes – apps causing Explorer to crash, or display driver issues.

To start, press this key combination:  CTRL+SHIFT+ESC

If this opens Task Manager and that window is NOT flickering:
The likely cause is Software Compatibility issue causing Explorer.exe to crash repeatedly.

  1. Use the File, Run option in Task Manager to open additional tools as-needed. Be sure to check the box to run tools as Administrator. These could include:
    appwiz.cpl:  Opens Programs and Features
    compmgmt.msc: Opens Computer Management
    cmd.exe
  2. You can search for crash events in the Event Logs and find if any third party DLLs are the faulting module in the Explorer,.exe crashes Or uninstall software that is likely to include shell extensions.
  3. If removing software does not resolve the issue, use these commands to repair Windows:
    dism /online /cleanup-image /restorehealth
    sfc /scannow

Removing these apps help resolve the issue:

  • Norton Antivirus
  • Other AV solutions
  • iCloud
  • IDT Audio (faulting module IDTNC64.cpl).


If Task Manager is flickering, or it didn’t open, proceed with display driver troubleshooting:
The likely cause is a display driver or display hardware issue.

  1. Boot to Safe Mode with Networking.
  2. Use the same steps here as for Black Screen issues – if dual chipset, disable built-in graphics, if still flickers, try with only the other chipset enabled.
  3. If this does not work, or there is only a single chipset, uninstall the device and remove the driver software.
  4. Then boot into Windows and update the drivers to the latest from the manufacturer.

Resolving single App issues by reinstalling it through Powershell command


This guide should be only used for trying to resolve single app issues

  1. Open Windows Powershell as Administrator
  1. Type in the following command(s) listed in the table below under the “Remove PowerShell Command” column to remove the associated native app. The app can be reinstalled using the Store App or by following the link listed in the table below. You will need to exit the Store app if it is already open before reinstalling the app.


Native App

Remove PowerShell Command

App Name in Store

Alarms & Clocks

get-appxpackage *Microsoft.WindowsAlarms* | remove-appxpackage

Windows Alarms & Clock

Calculator

get-appxpackage *Microsoft.WindowsCalculator* | remove-appxpackage

Windows Calculator

Camera

get-appxpackage *Microsoft.WindowsCamera* | remove-appxpackage

Windows Camera

Groove Music

get-appxpackage *Microsoft.ZuneMusic* | remove-appxpackage

Groove Music

Mail & Calendar

get-appxpackage *microsoft.windowscommunicationsapps* | remove-appxpackage

Mail & Calendar

Maps

get-appxpackage *Microsoft.WindowsMaps* | remove-appxpackage

Windows Maps

Movies & Tv

get-appxpackage *Microsoft.ZuneVideo* | remove-appxpackage

Movies & Tv

OneNote

get-appxpackage *Microsoft.Office.OneNote* | remove-appxpackage

OneNote

People

get-appxpackage *Microsoft.People* | remove-appxpackage

Microsoft People

Photos

get-appxpackage *Microsoft.Windows.Photos* | remove-appxpackage

Microsoft Photos

Voice Recorder

get-appxpackage *Microsoft.WindowsSoundRecorder * | remove-appxpackage

Windows Voice Recorder

Xbox

get-appxpackage *Microsoft.XboxApp* | remove-appxpackage

Xbox


Start Menu, Cortana, Settings, etc not responding


If you see an issue where modern OS elements like the Start Menu, Cortana, Microsoft Edge, Settings, Notifications, etc. are non-responsive, use the following steps:

  1. Open an Administrator CMD window.  If you can’t find a way, use these steps:
    1. Press CTRL+Shift+ESC to open Task Manager.
    2. Click File > Run New Task
    3. Make sure you have a check mark beside “Create this task with administrative privileges”
    4. Type CMD
  2. Type the following commands at the CMD prompt:
        dism /online /cleanup-image /restorehealth
        sfc /scannnow
  3. If EITHER command does not show a good outcome, we need to stop and repair Windows. We have 3 options:
    1. Go Back: If there are other significant issues, or if the customer is not sure of using Windows 10, Go Back. The plan from there will be to clean up the configuration to prepare for an upgrade.
    2. Reset: If possible, remove Antivirus/Sec Software and perform a Reset (keeping data and settings). Customers will need to reinstall apps with this option.
    3. In-Place Upgrade: If the customer is unwilling, we can try uninstalling the Antivirus/Sec Software and try an in-place upgrade. We should set expectation.


  1. If the above commands both completed and show no remaining issues, run these commands:
    powershell
    Get-AppXPackage -AllUsers |Where-Object {$_.InstallLocation -like "*SystemApps*"} | Foreach {Add-AppxPackage -DisableDevelopmentMode -Register "$($_.InstallLocation)\AppXManifest.xml"}
  2. Check to be sure this command ran, showed a blue progress indicator and then returns to the prompt.
    1. If you see a red error, then the command may have been typed or pasted incorrectly, or there may be an larger problem with Windows 10.  Try again.
  3. Check to see if the issue is resolved.
    1. If not, restart the PC.In this case try as a new administrator user account.

If the new user also fails, go up to the steps for “3. If EITHER command does not show…” above. We need to repair Windows.

Create a media disc http://go.microsoft.com/fwlink/p/?LinkId=616447 

Basic/Standard troubleshooting steps applicable for all scenarios are:

  • Software Cleanboot
  • Hardware cleanboot
  • Sfc /scannow
  • Dism restorehealth
  • Disable/uninstall Antivirus
  • Testing in another user account


WINDOWS 10: INSTALLATION


Prior to troubleshooting installation problems, always make sure to check the make and model of the computer if it has been tested by the OEM to fully run Windows 10. Check the OEM list of websites below for reference:


HP

http://www8.hp.com/us/en/ads/windows10/upgrade.html

HP Printers: http://support.hp.com/us-en/document/c04658195


DELL

http://www.dell.com/support/article/us/en/19/SLN297954/EN

Dell Printers: http://www.dell.com/support/Article/us/en/04/SLN297761/EN


Toshiba (Europe)

http://www.toshiba.eu/innovation/generic/windows10/


Toshiba (United States) http://win10upgrade.toshiba.com/swupdate/modellist.aspx?region=TAIS&lang=en&country=US


Acer

http://us.acer.com/ac/en/US/content/windows10-eligible-models#_ga=1.134218545.110854862.1438796589


Lenovo

https://support.lenovo.com/us/en/documents/ht10353


Packard Bell

http://www.packardbell.co.uk/pb/en/GB/content/windows10-eligible-models


Sony

http://esupport.sony.com/US/p/os10upgrade.pl


Gateway

http://us.gateway.com/gw/en/US/content/drivers-downloads


Emachines

http://www.emachines.com/ec/en/US/content/drivers


Also use the Windows Compatibility center to check for software or printer compatibilities

https://www.microsoft.com/en-us/windows/compatibility/CompatCenter/Home


Upgrade Rollback Issues/ Errors during Installation

  • Please collect MSDT Setup and Rollback Data prior to troubleshooting

Here are the rollbacks recorded so far with the appropriate T/S:

  • 20004     Logs = Yes, and an MSInfo32 .NFO upload would be good too.
    • Uninstall Antivirus and other sec/util software
    • Storage issues: Disconnect SATA cables for non-OS drives (if the customer can do it on their own). Disconnecting DVD drive is often reported as a workaround.
    • Disconnect non-essential hardware (including the Windows 10 USB install media as soon as the PC restarts for the first time during the upgrade).
    • Drivers
  • 20009     Logs = Yes
    • Drivers. Update chipset drivers.
  • 2000A     Logs = No
    • Transient. It may work if you try installing a 2nd time.
  • 2000C     Logs = No
    • Uninstall Antivirus and other sec/util software
    • Transient. It may work if you try installing a 2nd time.
  • 2000D     Logs = Yes
    • Problem in user profile
  • 20017    Logs = No
    • Uninstall Antivirus and other sec/util software
    • Drivers
    • External hardware
    • BIOS Security settings
    • Third party boot loader (GRUB)
    • Desktop utilities (IOBit, Intel Desktop Utilities, other tuning software)
    • Older NFORCE or SteelSeries drivers/software
  • 30017     Logs = Yes
    • Uninstall Antivirus and other sec/util software
    • Drivers
    • External hardware
  • 4000B     Logs = Yes
    • Uninstall Antivirus and other sec/util software
    • Drivers
  • 4000D    Logs = Yes
    • Problem in user profile
  • 4001E     Logs = Yes
    • Uninstall Antivirus and other sec/util software
    • Drivers

More information for other errors are found here: https://sharepoint.partners.extranet.microsoft.com/sites/GCS/commboard/Lists/Windows%20Upgrade%20and%20Update%20Error%20Codes/windows%2010%20Errors.aspx

How to analyze the log file entries that the Microsoft Windows Resource Checker (SFC.exe) program


INTRODUCTION
This article describes how to analyze the log files that the Microsoft Windows Resource Checker (SFC.exe) program generates in Windows Vista.
MORE INFORMATION

Overview

You can use the SFC.exe program to help you troubleshoot crashes that occur in the user mode part of Windows Vista. These crashes may be related to missing or damaged operating system files.

The SFC.exe program performs the following operations:
  • It verifies that non-configurable Windows Vista system files have not changed. Also, it verifies that these files match the operating system's definition of which files are expected to be installed on the computer.
  • It repairs non-configurable Windows Vista system files, when it is possible.

How to analyze the log file that the SFC.exe program generates

How to view the log file

The SFC.exe program writes the details of each verification operation and of each repair operation to the CBS.log file. Each SFC.exe program entry in this file has an [SR] tag. The CBS.log file is located in the %windir%\Logs\CBS folder.

Note The Windows Modules Installer service also writes to this log file. (The Windows Modules Installer service installs optional features, updates, and service packs.)

You can search for [SR] tags to help locate SFC.exe program entries. To perform this kind of search and to redirect the results to a text file, follow these steps:
  1. Click StartStart button, type cmd in the Start Search box, right-click cmd in the Programs list, and then clickRun as administrator.

     User Account Control permission If you are prompted for an administrator password or for a confirmation, type your password, or click Continue.
  2. Type the following command, and then press ENTER:
    findstr /c:"[SR]" %windir%\logs\cbs\cbs.log >sfcdetails.txt
The Sfcdetails.txt file includes the entries that are logged every time that the SFC.exe program runs on the computer.

How to interpret the log file entries

The SFC.exe program verifies files in groups of 100. Therefore, there will be many groups of SFC.exe program entries. Each entry has the following format:
date time entry_type details
The following sample excerpt from a CBS.log file shows that the SFC.exe program did not identify any problems with the Windows Vista system files:
<date> <time>, Info   CSI    00000006 [SR] Verifying 100 (0x00000064) components
<date> <time>, Info   CSI    00000007 [SR] Beginning Verify and Repair transaction
<date> <time>, Info   CSI    00000009 [SR] Verify complete
<date> <time>, Info   CSI    0000000a [SR] Verifying 100 (0x00000064) components
<date> <time>, Info   CSI    0000000b [SR] Beginning Verify and Repair transaction
<date> <time>, Info   CSI    0000000d [SR] Verify complete
<date> <time>, Info   CSI    0000000e [SR] Verifying 100 (0x00000064) components
<date> <time>, Info   CSI    0000000f [SR] Beginning Verify and Repair transaction
<date> <time>, Info   CSI    00000011 [SR] Verify complete
<additional entries>
<date> <time>, Info   CSI    00000011 [SR] Verify complete
The following sample excerpt from a CBS.log file shows that the SFC.exe program has identified problems with the Windows Vista system files:
<date> <time>, Info   CSI    00000006 [SR] Verifying 100 (0x00000064) components
<additional entries>
<date> <time>, Info   CSI    00000007 [SR] Beginning Verify and Repair transaction
<date> <time>, Info   CSI    00000008 [SR] Repairing corrupted file [ml:520{260},l:108{54}]"\??\E:\Program Files\Common Files\Microsoft Shared\DAO"\[l:20{10}]"dao360.dll" from store
<date> <time>, Info   CSI    0000000a [SR] Verify complete

Note Although the log file entry states that the SFC.exe program is repairing the changed file, no actual repair operation occurs when a file is verified.
 

The following table lists other messages that may be logged in the SFC.exe program entries of the CBS.log file after verification is completed.
Entry Example Explanation
Cannot repair member file file details Cannot repair member file [l:14{7}]"url.dll" of Microsoft-Windows-IE-WinsockAutodialStub, Version = 6.0.5752.0, pA = PROCESSOR_ARCHITECTURE_INTEL (0), Culture neutral, VersionScope = 1 nonSxS, PublicKeyToken = {l:8 b:31bf3856ad364e35}, Type neutral, TypeN This entry indicates that the file content does not match the operating system definition for the file. In this situation, the SFC.exe program cannot repair the file.
Repaired file file detailsby copying from backup Repaired file \SystemRoot\WinSxS\Manifests\\[ml:24{12},l:18{9}]"netnb.inf" by copying from backup This entry indicates that a problem exists with a file. The SFC.exe program can repair this file by copying a version from a private system store backup.
Repairing corrupted file [ml:520{260},l:36{18}]"\??\C:\Windows\inf"\[l:18{9}]"netnb.inf" from store Repairing corrupted file [ml:520{260},l:36{18}]"\??\C:\Windows\inf"\[l:18{9}]"netnb.inf" from store This entry indicates that a problem exists with a file. The SFC.exe program can repair this file by copying a version from the system store.
Manually reset Windows Update components

Important Follow the steps in this section carefully. Serious problems might occur if you modify the registry incorrectly. Before you modify it, back up the registry for restoration in case problems occur.

To reset the Windows Update components, follow these steps:

  1. Open a command prompt. To do this, use one of the following methods, depending on your version of Windows:
    • Windows 10: Press and hold (or right-click) the Windows logo button on the taskbar and then select Command Prompt (Admin). Click Yes when the User Account Control box appears.
    • Windows8.1 and Windows 8: From the Start screen, swipe in from the right side to display the charms, select Search, and then search for cmd. (Or, if you are using a keyboard and mouse, type cmd at the Start screen.) In the search results, press-and-hold or right-click Command Prompt, and then select Run as Administrator
    • Windows 7 and earlier versions: Press the Windows logo key + R, type cmd in the Run box, and then press Enter. Right-click cmd, and then select Run as Administrator.
  2. Stop the BITS service, the Windows Update service, and the Cryptographic service. To do this, at a command prompt, type the following commands. Make sure that you press Enter after you type each command.
    • net stop bits
    • net stop wuauserv
    • net stop appidsvc
    • net stop cryptsvc
  3. Delete the qmgr*.dat files. To do this, at a command prompt, type the following command, and then press Enter:
    Del "%ALLUSERSPROFILE%\Application Data\Microsoft\Network\Downloader\qmgr*.dat"
  4. If this is your first attempt at resolving your Windows Update issues by following the steps in this article, you should skip step 4 and go to step 5. You should follow step 4 at this point in the troubleshooting only if you cannot resolve your Windows Update issues after you follow all steps except step 4. (Step 4 is performed by the "Aggressive" mode of the Fix it Solution that was mentioned earlier.)
    1. Rename the softare distribution folders backup copies. To do this, at a command prompt, type the following commands. Make sure that you press Enter after you type each command.
      • Ren %systemroot%\SoftwareDistribution SoftwareDistribution.bak
      • Ren %systemroot%\system32\catroot2 catroot2.bak
    2. Reset the BITS service and the Windows Update service to the default security descriptor. To do this, at a command prompt, type the following commands. Make sure that you press Enter after you type each command.
      • sc.exe sdset bits D:(A;;CCLCSWRPWPDTLOCRRC;;;SY)(A;;CCDCLCSWRPWPDTLOCRSDRCWDWO;;;BA)(A;;CCLCSWLOCRRC;;;AU)(A;;CCLCSWRPWPDTLOCRRC;;;PU)
      • sc.exe sdset wuauserv D:(A;;CCLCSWRPWPDTLOCRRC;;;SY)(A;;CCDCLCSWRPWPDTLOCRSDRCWDWO;;;BA)(A;;CCLCSWLOCRRC;;;AU)(A;;CCLCSWRPWPDTLOCRRC;;;PU)
  5.  
    At a command prompt, type the following command, and then press Enter:
    cd /d %windir%\system32
  6. Reregister the BITS files and the Windows Update files. To do this, at a command prompt, type the following commands. Make sure that you press Enter after you type each command.
    • regsvr32.exe atl.dll
    • regsvr32.exe urlmon.dll
    • regsvr32.exe mshtml.dll
    • regsvr32.exe shdocvw.dll
    • regsvr32.exe browseui.dll
    • regsvr32.exe jscript.dll
    • regsvr32.exe vbscript.dll
    • regsvr32.exe scrrun.dll
    • regsvr32.exe msxml.dll
    • regsvr32.exe msxml3.dll
    • regsvr32.exe msxml6.dll
    • regsvr32.exe actxprxy.dll
    • regsvr32.exe softpub.dll
    • regsvr32.exe wintrust.dll
    • regsvr32.exe dssenh.dll
    • regsvr32.exe rsaenh.dll
    • regsvr32.exe gpkcsp.dll
    • regsvr32.exe sccbase.dll
    • regsvr32.exe slbcsp.dll
    • regsvr32.exe cryptdlg.dll
    • regsvr32.exe oleaut32.dll
    • regsvr32.exe ole32.dll
    • regsvr32.exe shell32.dll
    • regsvr32.exe initpki.dll
    • regsvr32.exe wuapi.dll
    • regsvr32.exe wuaueng.dll
    • regsvr32.exe wuaueng1.dll
    • regsvr32.exe wucltui.dll
    • regsvr32.exe wups.dll
    • regsvr32.exe wups2.dll
    • regsvr32.exe wuweb.dll
    • regsvr32.exe qmgr.dll
    • regsvr32.exe qmgrprxy.dll
    • regsvr32.exe wucltux.dll
    • regsvr32.exe muweb.dll
    • regsvr32.exe wuwebv.dll
  7. Reset Winsock. To do this, at a command prompt, type the following command, and then press Enter:
    netsh winsock reset
  8. If you are running Windows XP, you have to configure the proxy settings. To do this, at a command prompt, type the following command, and then press Enter:

    proxycfg.exe -d
    If you are running other versions of Windows, at a command prompt, type the following command, and then press Enter:
    netsh winhttp reset proxy
  9. Restart the BITS service, the Windows Update service, and the Cryptographic service. To do this, at a command prompt, type the following commands. Make sure that you press Enter after you type each command.
    • net start bits
    • net start wuauserv
    • net start appidsvc
    • net start cryptsvc
  10. Windows Vista only: Clear the BITS queue. To do this, at a command prompt, type the following command, and then press Enter:
    bitsadmin.exe /reset /allusers
  11. Install the latest Windows Update Agent.
  12. Restart the computer.


How to Do a Repair Install of Windows 10 with an In-place Upgrade


information   Information
If you're having problems with Windows 10 on your PC, you could use push-button reset to refresh or resetWindows.

Refresh your PC Fixes software problems by reinstalling the OS while preserving the user data, user accounts, and important settings. All other preinstalled customizations are restored to their factory state. In Windows 10, this feature no longer preserves user-acquired Windows apps.

Reset your PC prepares the PC for recycling or for transfer of ownership by reinstalling the OS, removing all user accounts and contents (e.g. data, Classic Windows applications, and Universal Windows apps), and restoring preinstalled customizations to their factory state.

The options above are great for what they are intended for, but you could also do a repair install of Windows 10 by performing an in-place upgrade without losing anything other than all installed Windows Updates.

This tutorial will show you how to do a repair install of Windows 10 by performing an in-place upgrade without losing anything.

You must be signed in as an administrator to be able to do a repair install of Windows 10.
 
----------------------------------------------------------------------------------------------------------------------------------------------------------------------
 
Note   Note

  • You will only be able to do a repair install of Windows 10 from within Windows 10. You will not be able to do a repair install at boot or in Safe Mode.
  • You will need at least around 8.87 GB + what Windows is currently using of free space available on the Windows drive.
  • The installation media (ex: ISO or USB) must be the same edition and build as your currently installed Windows 10. If it's not, then the repair install will fail.
  • The installation media (ex: ISO or USB) must be the same language as your currently installed Windows 10. If it's not, then you will not keep anything.
  • If you have a 32-bit Windows 10, then you must use a 32-bit ISO or USB.
  • If you have a 64-bit Windows 10, then you must use a 64-bit ISO or USB.
----------------------------------------------------------------------------------------------------------------------------------------------------------------------
 
warning   Warning
Before you get started doing a repair install of Windows 10, be sure that you temporarily disable Secure Boot in yourUEFI firmware settings. Once installation has finished, you can enable Secure Boot again if you like.

  • System Protection will be reset to the default of being turned off. It is recommended to turn on system protection after the repair install has finished to have restore points.
  • You will lose any custom fonts.
  • You will lose any customized system icons.
  • You may need to re-establish your Wi-Fi connection.
  • You will need to redo Windows updates subsequent to the build you have used for the repair install.
  • Windows.old will be created.
  • You will need to redo any language downloads including the display language if you changed that.


----------------------------------------------------------------------------------------------------------------------------------------------------------------------


Here's How:

1. Sign in to an administrator account in Windows 10.

2. If you have not already, you will need to disable or uninstall any 3rd party AV or security program you have installed first to prevent it from interfering with the upgrade to Windows 10. You can reinstall it after Windows 10 has finished installing.

3. Do the step below depending on what you are using to do a repair install of Windows 10 with.

  • step 4: To do a repair install of Windows 10 with an ISO file
  • step 5: To do a repair install of Windows 10 with USB installation media
  • step 6: To do a repair install of Windows 10 with Get Windows 10 (GWX) app
  • step 7: To do a repair install of Windows 10 with Media Creation Tool.


 4. To Do a Repair Install of Windows 10 with an ISO file

A) If you have not already, you will need to download a Windows 10 ISO file.

B) Mount the ISO file.

C) Run the setup.exe file to start Windows 10 Setup.
 
(see screenshot below)

Click image for larger version. 

Name:	Windows_10_repair_install-1.png 
Views:	1863 
Size:	52.2 KB 
ID:	31428

D) If prompted by UAC, click/tap on Yes.

E) Go to step 8 below.


 5. To Do a Repair Install of Windows 10 with USB Installation Media

A) If you have not already, you will need to create a Windows 10 installation USB flash drive.

B) Connect and open the USB flash drive, and run the setup.exe file to start Windows 10 Setup. (see screenshot below)

Click image for larger version. 

Name:	Windows_10_repair_install-1.png 
Views:	1863 
Size:	52.2 KB 
ID:	31428

C) If prompted by UAC, click/tap on Yes.

D) Go to step 8 below.


 6. To do a repair install of Windows 10 with Get Windows 10 (GWX) app

A) Click/tap on the Download button below to go to Microsoft, and click/tap on the top Upgrade now button at Microsoft's site.

download

Click image for larger version. 

Name:	Get_Windows_10_app.png 
Views:	737 
Size:	139.2 KB 
ID:	63352

B) Save the GetWindows10-sds_____________.exe file to your desktop, and run it.

C) If prompted by UAC, click/tap on Yes.

D) Windows 10 will now start downloading. Go to step 10 below.


 7. To do a repair install of Windows 10 with Media Creation Tool

A) Click/tap on the Download button below to go to Microsoft, and click/tap on the bottom Download tool now button at Microsoft's site.

download

Click image for larger version. 

Name:	Media_Creation_Tool-1.png 
Views:	537 
Size:	139.5 KB 
ID:	63353

B) Save the MediaCreationTool.exe file to your desktop, and run it.

D) If prompted by UAC, click/tap on Yes.

E) Click/tap on Accept for the license terms. (see screenshot below)

Click image for larger version. 

Name:	Media_Creation_Tool-2A.png 
Views:	468 
Size:	23.5 KB 
ID:	63358

F) Select (dot) Upgrade this PC now, and click/tap on Next. (see screenshot below)

G) Windows 10 will now start downloading. Go to step 10 below.

Click image for larger version. 

Name:	Media_Creation_Tool-2.png 
Views:	446 
Size:	16.3 KB 
ID:	63354

8. Windows 10 Setup will now start preparing. (see screenshot below)

Name:  Windows_10_repair_install-2.jpg
Views: 321448
Size:  11.0 KB

9. Select (dot) Download and install updates, and click/tap on Next. (see screenshot below)

Click image for larger version. 

Name:	Windows_10_repair_install-3.png 
Views:	1199 
Size:	24.8 KB 
ID:	31430

10. Windows 10 Setup will now start getting things ready. (see screenshots below)

Click image for larger version. 

Name:	Windows_10_repair_install-4.png 
Views:	1534 
Size:	32.1 KB 
ID:	31431

11. Click/tap on Accept for the license terms. (see screenshot below)

Click image for larger version. 

Name:	Windows_10_repair_install-5.png 
Views:	775 
Size:	32.7 KB 
ID:	31432

12. Windows 10 Setup will now check for and install any available updates, and make sure you're ready to install. (see screenshots below)

Click image for larger version. 

Name:	Windows_10_repair_install-6.png 
Views:	1888 
Size:	33.1 KB 
ID:	31433

13. When ready, click/tap on Install to start the repair install of Windows 10. (see screenshot below)

Click image for larger version. 

Name:	Windows_10_repair_install-7.png 
Views:	902 
Size:	17.6 KB 
ID:	31434
Note   Note
If you would like to change what you keep, then click/tap on the Change what to keep link, choose what to keep, click/tap on Next, and go to step 12 above.

If you don't have Keep personal files and apps selected, you will not keep everything.

Click image for larger version. 

Name:	Windows_10_repair_install-8.png 
Views:	959 
Size:	20.0 KB 
ID:	31435

14. Windows 10 Setup will now start the in-place upgrade to repair install Windows. (see screenshots below)
Note   Note
This will take a while to finish.


Click image for larger version. 

Name:	Windows_10_repair_install-9.jpg 
Views:	1552 
Size:	157.0 KB 
ID:	31436

15. When it's ready, click/tap on Next. (see screenshot below)

Click image for larger version. 

Name:	Windows_10_repair_install-10.jpg 
Views:	700 
Size:	29.1 KB 
ID:	31437

16. Click/tap on Use Express settings or Customize settings for how you want to set these settings, and go to step 20 (Use express settings) orstep 17 (Customize settings) below. (see screenshot below)

Click image for larger version. 

Name:	Windows_10_repair_install-11.jpg 
Views:	1541 
Size:	108.2 KB 
ID:	31438

17. Turn On or Off the Personalization and Location settings you would like, and click/tap on Next. (see screenshot below)

Click image for larger version. 

Name:	Windows_10_repair_install-10b.jpg 
Views:	621 
Size:	67.6 KB 
ID:	31447

18. Turn On or Off the Browser and protection and Connectivity and error reporting settings that you want, and click/tap on Next. (see screenshot below)

Click image for larger version. 

Name:	Windows_10_repair_install-12.jpg 
Views:	524 
Size:	78.8 KB 
ID:	31439

19. Click/tap on Next. (see screenshot below)
Note   Note
You will always be able to choose your default apps in Windows at anytime.


Click image for larger version. 

Name:	Windows_10_repair_install-13.jpg 
Views:	911 
Size:	100.8 KB 
ID:	31440

20. You can now sign in to Windows 10. (see screenshots below)

Click image for larger version. 

Name:	Windows_10_repair_install-14.jpg 
Views:	638 
Size:	185.1 KB 
ID:	31441
 
 
How to Do a Repair Install to Fix Windows 7


information   Information
This will show you how to do a repair install (aka: in-place upgrade install) to fix your currently installedWindows 7 and preserve your user accounts, data, programs, and system drivers.
Note   Note
Do a Repair installation if:
  • A System Restore did not help fix your Windows 7.
  • There is no other easier option left that can fix your Windows 7.
  • You DO NOT want to do a Clean reinstall of Windows 7.
  • You DO want to preserve your user accounts, data, programs, and system drivers.
Tip   Tip
ITEMS THAT WILL BE RESET TO DEFAULT OR AFFECTED:
  • Sounds
  • Services
  • Visual Effects Settings
  • Device Drivers - Be sure to have these handy to reinstall. They do not always remain after the repair (upgrade) install.
  • You may lose the ability to sign on to MSN Messenger, to solve this problem have a look at this threadUnable to sign in to WLM.
  • You may lose your custom themes due to not having permisions set on the old themes. Go to thehidden themes folder at C:/Users/(User-Name)/AppData/Local/Microsoft/Windows/Themes, then Take Ownership of the themes folder and you will now have all your themes back.
  • It has been reported that you may also lose your Media Center gadget after doing the repair install.
  • Windows Updates will need to be checked and reinstalled again.
warning   Warning
  • You can only do a repair install with the same edition Windows 7 installation disc for the same edition of Windows 7 that you have installed.
  • You cannot use a OEM Windows 7 "Factory" Restore/Recovery type of installation disc that came with or created from a store bought computer to do a repair install with. These can only be used do a clean install instead.
  • You can do a repair install on a factory OEM installation with the latest official Windows 7 with SP1ISO file here: Microsoft: Windows 7 Direct Download Links, and use Windows 7 USB-DVD Download Tool to create a bootable DVD or USB flash drive with the ISO to do the repair install from within Windows 7.
  • You can use a retail OEM Windows 7 installation disc to do a repair install with.
  • You can use a retail (full or upgrade) Windows 7 installation disc to do a repair install with.
  • You cannot do a repair install with a System Repair Disc. A System Repair Disc is not a installation disc, and will only boot to the System Recovery Options screen.
  • If you have a 32-bit (x86) Windows 7 currently installed, then you must use a 32-bit Windows 7 installation disc to be able to do a repair install with.
  • If you have a 64-bit (x64) Windows 7 currently installed, then you must use a 64-bit Windows 7 installation disc to be able to do a repair install with.
  • You can use a retail Windows 7 SP1 installation disc (ex: Technet (available), MSDN (available), or retail (when available)) to do a repair install with on a currently installed Windows 7 SP1.
  • You can use a Windows 7 SP1 installation disc (ex: Technet (available), MSDN (available), or retail (when available)) to do a repair install with on a currently installed slipstream Windows 7 SP1.
  • You cannot use a slipstream Windows 7 installation disc to do a repair install with on a currently installed Windows 7 SP1.
  • You cannot use a slipstream Windows 7 installation disc to do a repair install with on a currently installed slipstream Windows 7 SP1.
  • You can only do a repair install from within Windows 7.
  • You cannot do a repair install at boot or in Safe Mode.
  • You must be logged into Windows 7 in a administrator account to be able to do a repair install.
  • You must have at least 8.87 GB + what is currently being used of free space (more if you have a larger installation) on the hard drive/partition Windows 7 is installed on to do a repair install.
  • If you changed the default location of a user account's profile folder, then you will need to change it back to the default C:\Users location first.
  • If you moved the default location of a user folder, then you will need to change it back to the default C:\Users\(user-name) location first.


Here's How:
NOTE: Be sure to back up anything that you do not want to lose first to be extra safe.

1. Start Windows 7, and log on to an administrator account.

2. Disable any 3rd party firewall, antivirus, or other security program to avoid it from possibly preventing the repair in-place upgrade installation of Windows 7.

3. Do either step 4, step 5, or step 6 below depending if your retail Windows 7 installation ISO/DVD/USB has SP1 or not, and if your currently installed Windows 7 has SP1 installed or not.

4. Repair Installed Windows 7 SP1 using Windows 7 with SP1 ISO

Note   Note
If you do not have a Windows 7 with SP1 ISO, then you can download an official ISO with your retail product key from Microsoft at the link below.

Microsoft Software Recovery

You can also download the latest official Windows 7 SP1 Media Refresh (SP1 U) ISO file at the link below, but this link is not always available for download.

Microsoft: Windows 7 Direct Download Links

A) If you have not already, you will need to install a program like 7-Zip that supports extracting a ISO to a folder.

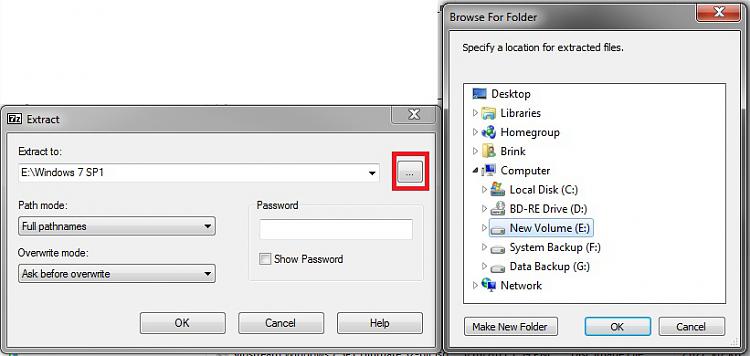
B) Using the program (ex: 7-Zip) from step 1, extract the Windows 7 SP1 ISO file to a folder on a partition or HDD other than the current Windows 7 partition. (see screenshot below)
NOTE: For example with 7-Zip, right click on ISO, click on 7-Zip, Extract files, browse button, select where you want to extract to, and click on OK twice.
-7-zip.jpg
C) While in Windows 7 SP1, open the folder that you extracted the ISO into, and run the setup.exe file.

D) Go to step 7 below.
5. Repair Installed Windows 7 SP1 using Windows 7 with SP1 DVD/USB

Note   Note
If you do not have a Windows 7 with SP1 ISO, then you can download an official ISO with your retail product key from Microsoft at the link below.

http://www.microsoft.com/en-us/software-recovery

You can also download the latest official Windows 7 SP1 Media Refresh (SP1 U) ISO file at the link below, but this link is not always available for download.

Microsoft: Windows 7 Direct Download Links

Afterwards, you can use Windows 7 USB-DVD Download Tool to create a bootable DVD or USB flash drive with the ISO to do the repair install from within Windows 7 using this step.

A) While in Windows 7 SP1, insert your retail Windows 7 SP1 installation DVD into the DVD drive, or connect yourWindows 7 with SP1 installation USB thumb drive, and click on the Run setup.exe option in AutoPlay. (see screenshot below)
NOTE: If the AutoPlay window does not open, then open the drive folder in Computer and run the setup.exe file.
Name:  AutoPlay.jpg
Views: 1361993
Size:  72.7 KB
B) Go to Go to step 7 below.
6. Repair Installed Windows 7 without SP1 using Windows 7 without SP1 DVD/USB

Note   Note
If you do not have a Windows 7 without SP1 installation DVD/USB, then you can download the latest official Windows 7 Professional or Home Premium without SP1 ISO file here: Microsoft: Windows 7 Direct Download Links, and use Windows 7 USB-DVD Download Tool to create a bootable DVD or USB flash drive with the ISO to do the repair install from within Windows 7 using this step.

It is preferred to have SP1 installed on your PC and to use step 4 or step 5 above to do a repair install with instead though.

A) While in Windows 7 SP1 installed, insert your retail Windows 7 installation DVD into the DVD drive, or connect your Windows 7 installation USB thumb drive, and click on the Run setup.exe option in AutoPlay. (see screenshot below)
NOTE: If the AutoPlay window does not open, then open the drive folder in Computer and run the setup.exe file.
Name:  AutoPlay.jpg
Views: 1361993
Size:  72.7 KB
B) Go to Go to step 7 below.
7. If prompted by UAC, then click on Yes.

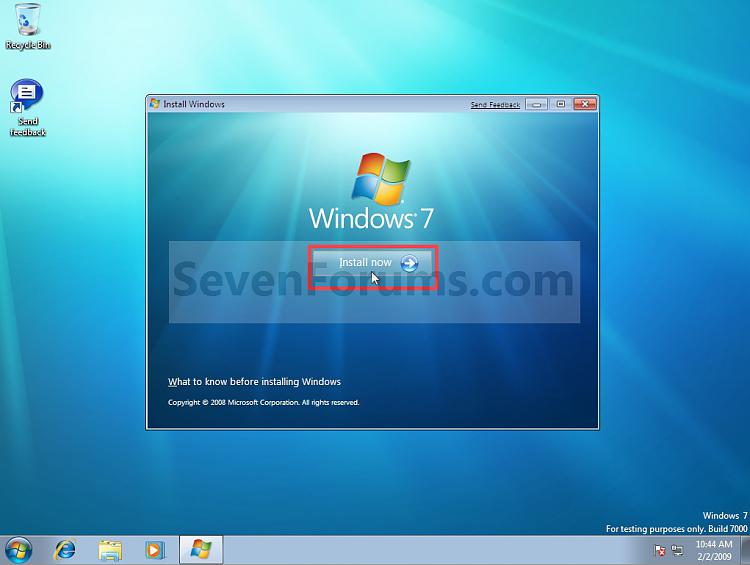
8. Click on the Install Now button to start the installation. (see screenshot below)
-step1.jpg
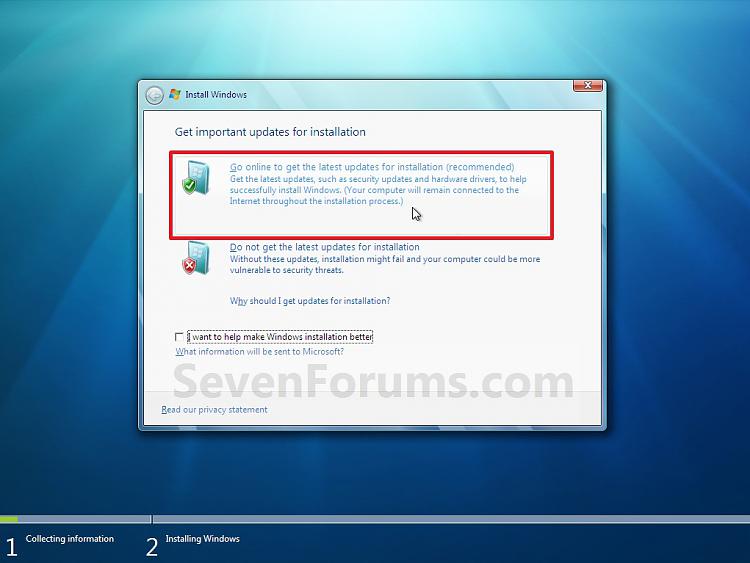
9. If prompted, uncheck the I want to help make Windows installation better box (unless you would like to ), and click on the Go online to get the latest updates for installation option. (see screenshot below)
-step2.jpg
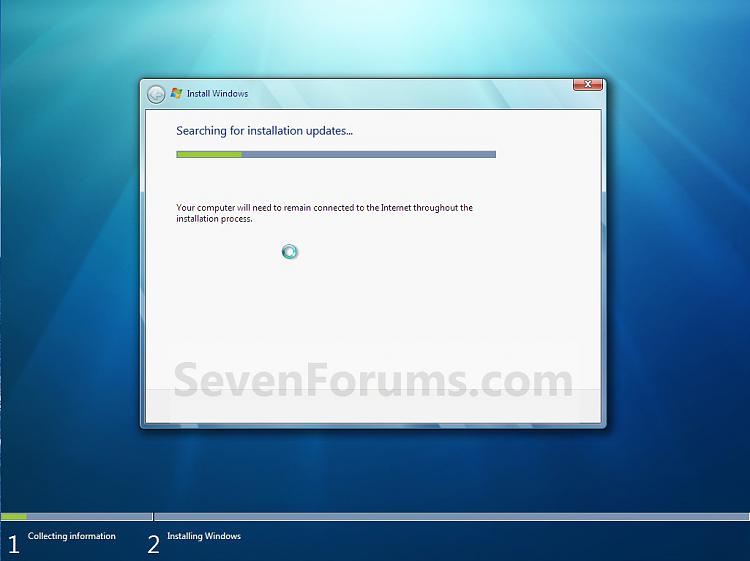
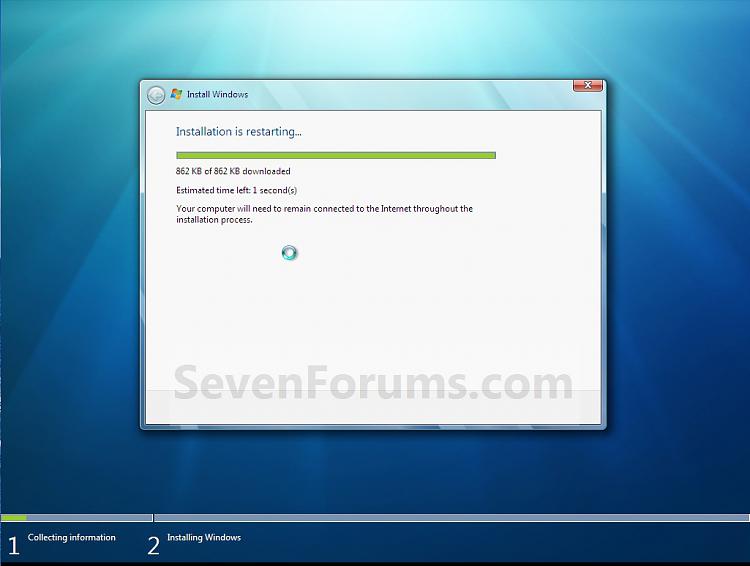
A) Windows 7 will now check online for and install any available installation updates. (see screenshots below)
-step2a.jpg

-step2b.jpg

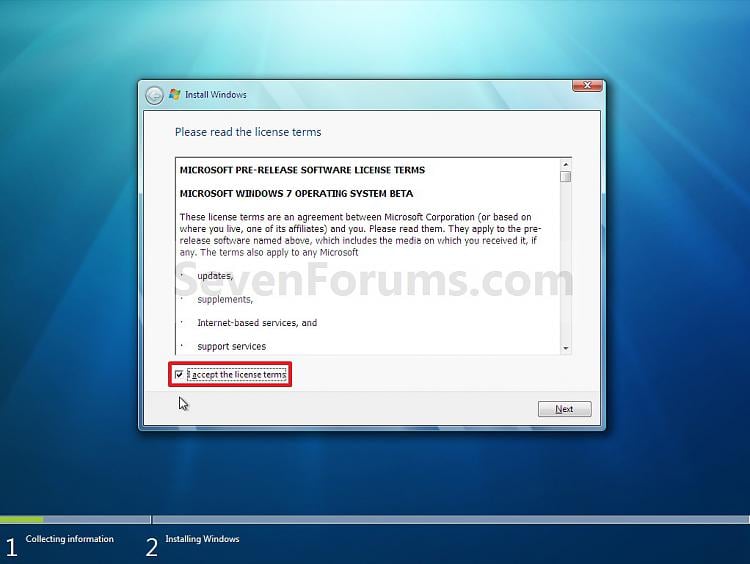
10. Check the I accept the license terms box, and click on Next. (see screenshot below)
-step3.jpg
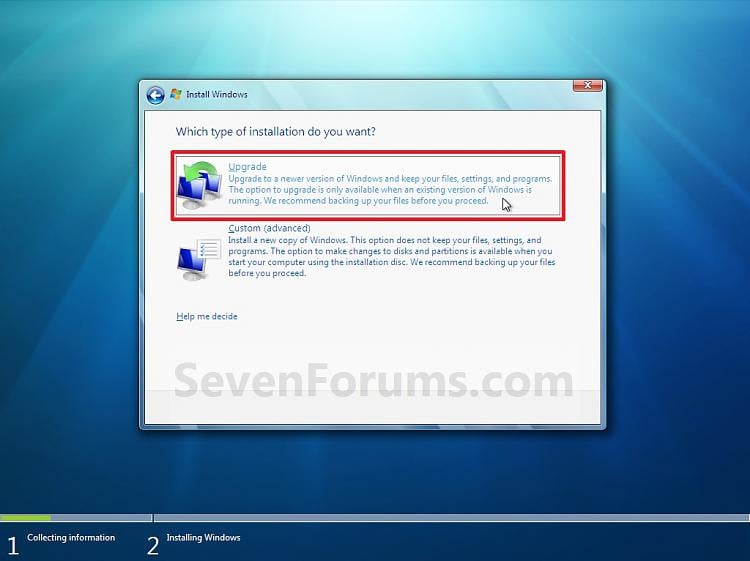
11. Click on the Upgrade option. (see screenshot below)
-step4.jpg
12. Windows will now check for any compatibility issues. If any are found like in the example below, take care of them first then restart the repair install process over again.
Name:  Compatibility-Report.jpg
Views: 1368221
Size:  84.7 KB
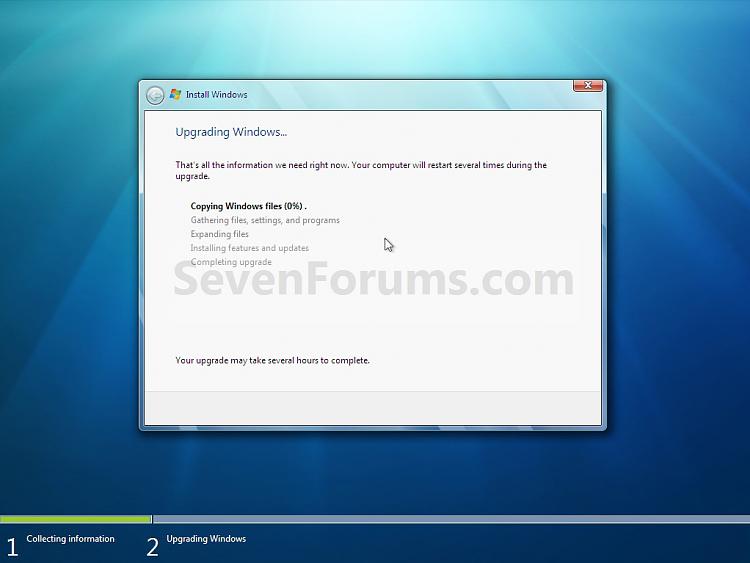
13. The installation of Windows 7 will now begin. (see screenshot below)
NOTE: During the installation process, your screen may flash and computer will restart a few times.
-step5.jpg
14. After the final restart, you will see this screen for a moment. (see screenshot below)
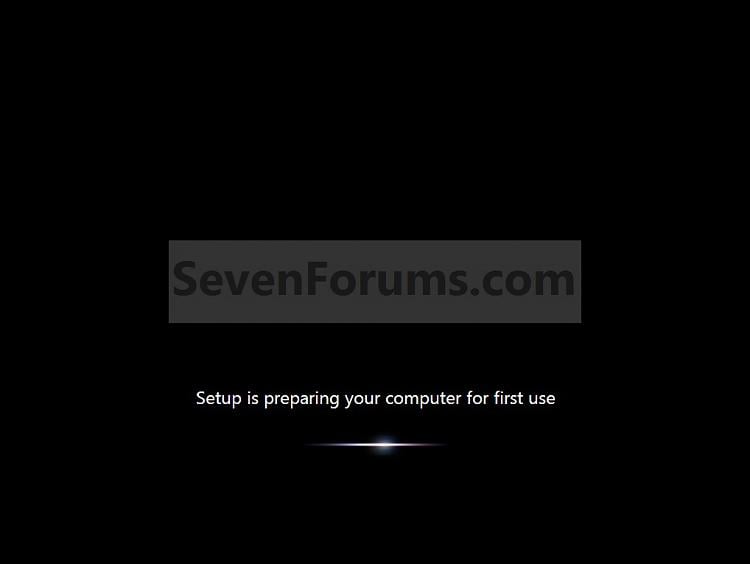
-step6.jpg
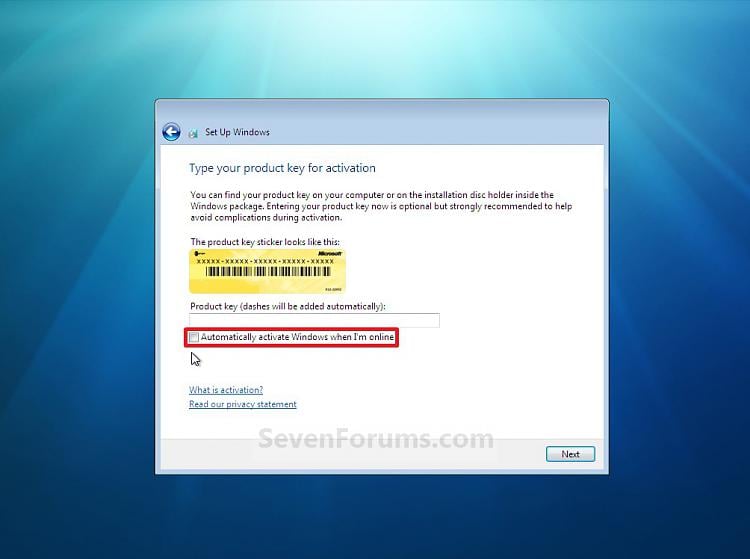
15. Type in your Windows 7 product key number. (see screenshot below step 16)

16. Uncheck the Automatically activate Windows when I'm online box unchecked, then click on the Next button. (see screenshot below)
NOTE: You can activate Windows 7 later after you make sure it is running properly. (see step 23 below)
If you chose to automatically activate Windows online when you set up your computer, automatic activation begins trying to activate your copy of Windows three days after you log on for the first time.
-step7.jpg
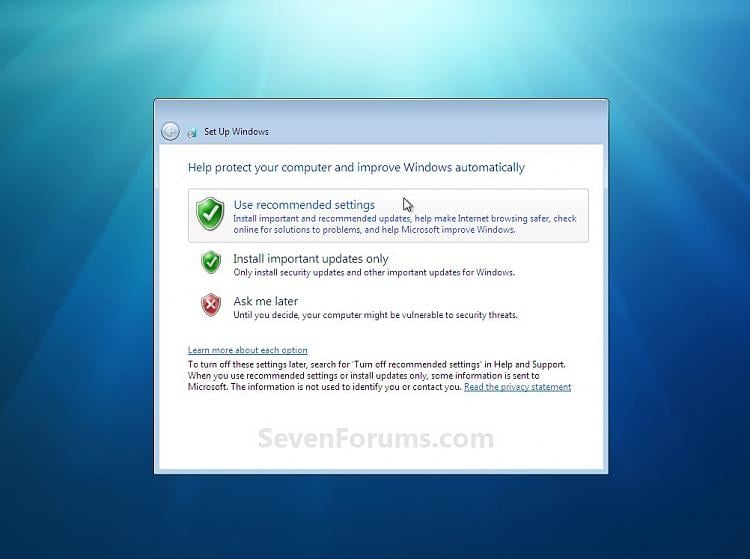
17. Click on Use recommended settings. (see screenshot below)
-step8.jpg
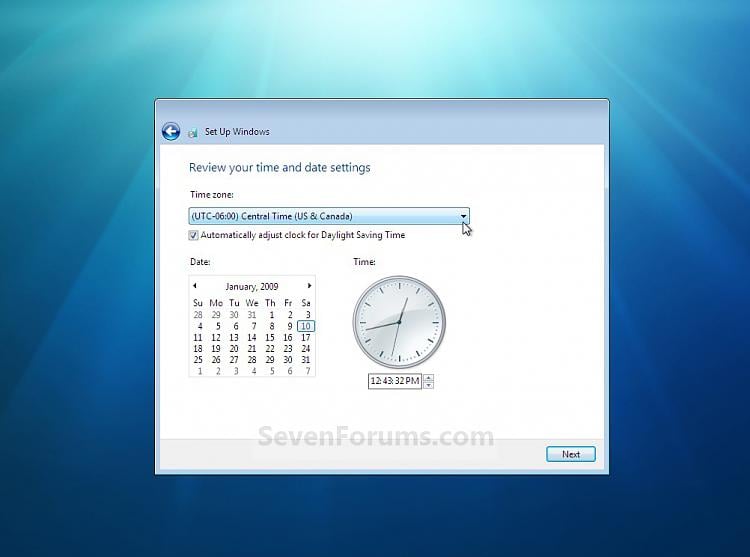
18. Select your time zone and set your time and date settings, then click on the Next button. (see screenshot below)
-step9.jpg
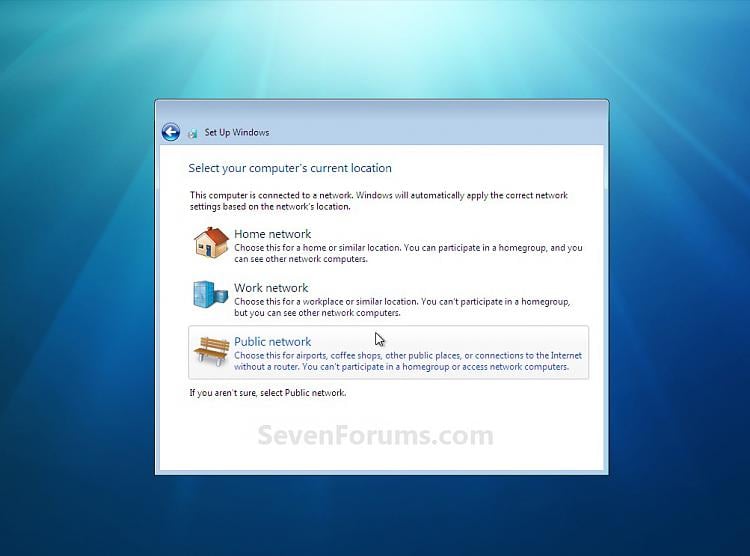
19. Click on the option for your computer's location to select the correct network location type settings to be applied for that location. (see screenshot below)
NOTE: It is best to select Public location for the best security.
-step10.jpg
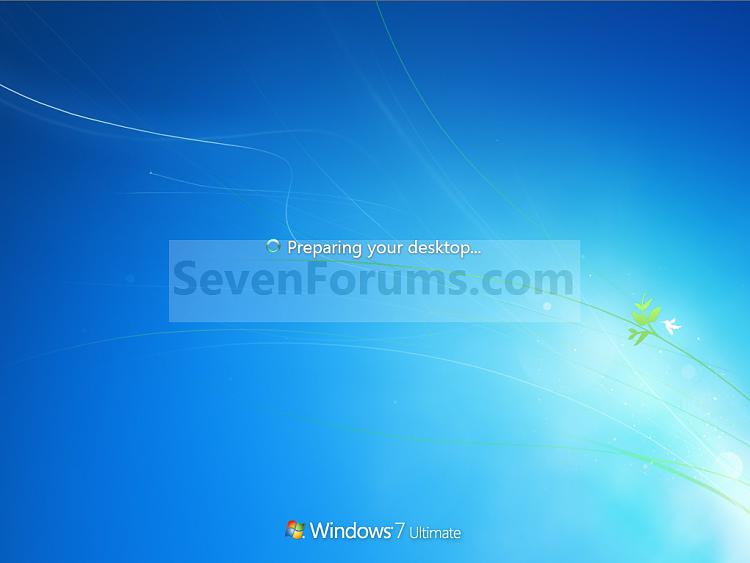
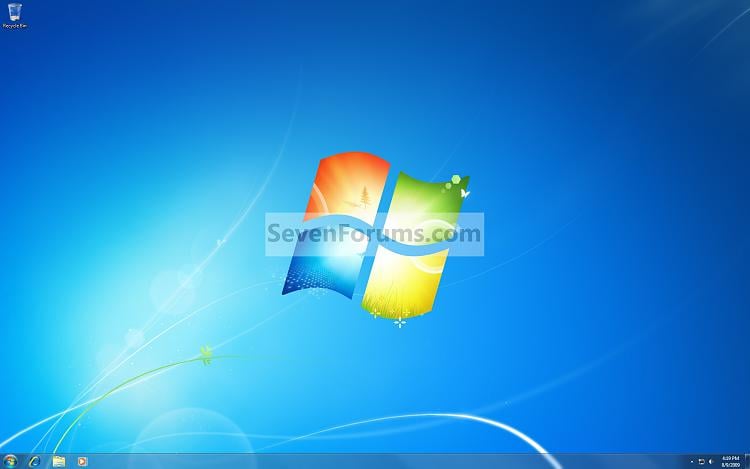
20. Windows 7 will now prepare your desktop to startup. (see screenshots below)
-step11a.jpg

-desktop.jpg

21. If you used a DVD or USB to do the repair install with, then you can remove the DVD or USB when the repair install has successfully completed and you are logged in to Windows 7.

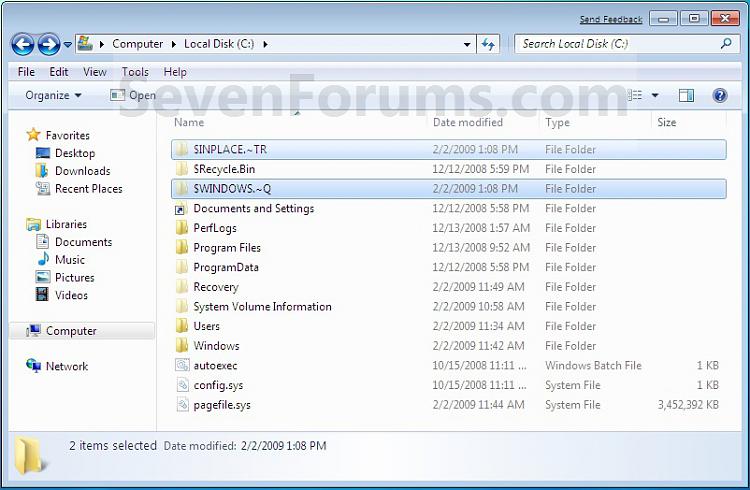
22. Check to see if you are missing any user files. If you are, then you can copy them from the C:\Windows.old or thehidden protected operating system C:\$INPLACE.~TR and C:\WINDOWS.~Q backup folders. (see screenshot below)
-old_install.jpg
23. If everything checks out in step 21, then you can run Disk Cleanup (step 5 at this link). You will need to click on theClean up system files button first, and then could check the Files discarded by Windows upgrade, Previous Windows installations, and Windows upgrade log files boxes. (see screenshot below)
NOTE: This will delete the C:\Windows.old, C:\$INPLACE.~TR and C:\WINDOWS.~Q folders from step 21 above.
Name:  Disk_Cleanup.jpg
Views: 1356119
Size:  133.3 KB
24. Refresh your Windows Experience Index (WEI) score.

25. When finished, activate Windows 7, and make sure that your 3rd party security programs (if applicable) are enabled again.
Source: http://www.sevenforums.com/tutorials/3413-repair-install.html?ltr=R 


How to Repair Install Windows 8 and 8.1 without Losing Anything


information   Information
Windows 8 introduced the option to refresh and reset your PC to repair or reinstall Windows 8 with as needed. These new features are great for what they are intended for, but there are some drawbacks to them.

When you reset your PC, it will basically give you a clean install (retail) or factory recovery (preinstalled OEM) of Windows 8 afterwards. You will lose everything from your current Windows 8 installation.

When you refresh your PC, this basically repairs Windows 8 by reinstalling it while keeping your files, Store apps, most of your settings, etc..... However, all installed 3rd party desktop apps will be removed. If you like, you could create a custom refresh image to not lose anything, but this will require creating new custom refresh images every so often to keep it updated to not lose anything since the last image was created.


This tutorial will show you how to do a repair install (aka: in-place upgrade install) to fix your currently installed Windows 8 without losing anything. For example, desktop apps.

You must be signed in as an administrator to be able to do a repair install of Windows 8.

Note   Note
Settings that will be Preserved when doing a Repair Install

  • All user accounts.
  • Files in all users' C:\Users\(user-name) folders. (ex: Desktop, My Documents, My Music, etc...)
  • Wireless network connections.
  • Apps from the Windows Store will be kept.
  • All installed 3rd party desktop programs will be kept.
  • Mobile broadband connections.
  • BitLocker and BitLocker To Go settings.
  • Windows Firewall settings.
  • Drive letter assignments.
  • File type associations set per user.
  • Metro apps settings per user.
  • Display settings.
  • Personalization settings such as lock screen background and desktop wallpaper.
  • All users' PC settings will be kept.
  • Choices you made during Windows Welcome, such as computer name and user accounts, will not change.
  • Network, Libraries, and Windows Update settings will not change.
  • Customer Experience Improvement Program settings will not change.
  • Windows Error Reporting settings will not change.
  • Some drivers may or may not be removed, but usually will remain.

 
Settings that will be NOT be Preserved when doing a Repair Install

warning   Warning

  • You will only be able to do a repair install from within Windows 8.
  • You will not be able to do a repair install at boot or in Safe Mode.
  • You must have at least 8.87 GB + what is currently being used of free space on the hard drive/partition that Windows 8 is installed on. You may need more if you have a larger installation.


Be sure to back up anything that you do not want to lose before doing a repair install just to be extra safe. For example, if you lose power in the middle of doing the repair install.


Here's How:

1. Start Windows 8 or Windows 8.1, and sign in to an administrator account.

2. Disable any 3rd party firewall, antivirus, or other security program to avoid it from possibly preventing the repair in-place upgrade installation of Windows 8.

3. Do step 4 or 5 below depending on what you would like to use to do the repair install with.


4. If Using a Windows 8/8.1 DVD or USB to do a Repair Install with

Note   Note


A) Insert/connect and open the DVD or USB, and go to step 6 below.


5. If Using a Windows 8/8.1 ISO file to do a Repair Install with

Note   Note

  • The ISO you use must be for the same language as the Windows edition you currently have installed.
  • If you have Windows 8 installed, then you must use a Windows 8 ISO.
  • If you have Windows 8.1 installed, then you must use a Windows 8.1 ISO.
  • If you have Windows 8.1 Update installed, then you must use a Windows 8.1 Update ISO.
  • If you have 32-bit Windows installed, then you can only use a 32-bit Windows ISO.
  • If you have 64-bit Windows installed, then you can only use a 64-bit Windows ISO.
  • If you installed 64-bit Windows with UEFI, then you can only use a 64-bit Windows ISO.

A) Mount the ISO.

B) Open the mounted ISO from This PC if it didn't automatically open, and go to step 6 below.


6. Double click/tap on the setup file to run it. (see screenshot below)


Click image for larger version


7. If prompted by UAC, then click/tap on Yes.

8. If this is for Windows 8 Enterprise, then click/tap on Install now. (see screenshot below)


Name:  Windows_8_Repair_Install_Windows-1A.jpg
Views: 259743
Size:  28.7 KB


9. If prompted, select (dot) Download and install updates, and click/tap on Next (Windows 8/8.1 or Windows 8/8.1 Pro). (see screenshots below)
NOTE: If any updates are found, then they will be installed, and installation will restart and continue on to step 10.


Click image for larger version

Name:  Windows_8_Repair_Install_Windows-2B.jpg
Views: 261200
Size:  73.8 KB


10. Enter your product key that matches the installed edition of Windows, and click/tap on Next. (see screenshot below)

Note   Note
The product key you enter must match what you are installing, or it will not work.

If you have a Windows 8 product key with Windows 8 installed, then you are good.

If you have a Windows 8.1 product key with Windows 8.1 or Windows 8.1 Update installed, then you are good.

If you have a Windows 8 product key with Windows 8.1 or Windows 8.1 Update installed, then you would need to enter a generic key below to install with, and change the product key later on in step 24 below to activate with your Windows 8 key instead.

If you have Windows 8 Enterprise, Windows 8. Enterprise, or Windows 8.1 Update Enterpriseinstalled, then you would need to change the product key later on in step 24 below to activate since Enterprise editions do not ask to enter a key at this step.

 
  • Windows 8 (core): FB4WR-32NVD-4RW79-XQFWH-CYQG3
  • Windows 8 Pro: XKY4K-2NRWR-8F6P2-448RF-CRYQH
  • Windows 8 Pro with Media Center: RR3BN-3YY9P-9D7FC-7J4YF-QGJXW


  • Windows 8.1 (core): 334NH-RXG76-64THK-C7CKG-D3VPT
  • Windows 8.1 Pro: XHQ8N-C3MCJ-RQXB6-WCHYG-C9WKB
  • Windows 8.1 Pro with Media Center: GBFNG-2X3TC-8R27F-RMKYB-JK7QT
  • Windows 8.1 Enterprise: MNDGV-M6PKV-DV4DR-CYY8X-2YRXH OR FHQNR-XYXYC-8PMHT-TV4PH-DRQ3H

KMS setup keys (8/8.1): Appendix A: KMS Client Setup Keys

Click image for larger version


11. Check the I accept the license terms box, and click/tap on Accept (Windows 8 or Windows 8 Pro) or Next (Windows 8 Enterprise). (see screenshots below)


Click image for larger version

Name:  Windows_8_Repair_Install_Windows-4B.jpg
Views: 258232
Size:  74.7 KB


12. If this is for Windows 8 or Windows 8 Pro, then select (dot) Keep Windows settings, personal files, and apps, click/tap on Next, and go to step 14 below. (see screenshot below)


Click image for larger version


13. If this is for Windows 8 Enterprise, then click/tap on Upgrade: Install Windows and keep files, settings, and applications. (see screenshot below)


Name:  Windows_8_Repair_Install_Windows-5B.jpg
Views: 258353
Size:  83.5 KB


14. Windows 8 will now check for compatibility issues to see if you'll need to do anything to get your PC ready for Windows 8. If anything is found, you will need to take care of them before continuing. (see screenshot below)


Click image for larger version


15. If this is for Windows 8 or Windows 8 Pro and no issues were found from step 14 above, then click/tap on Install. (see screenshot below)


Click image for larger version


16. Windows 8 will now start to install. The computer will restart a few times during this. (see screenshots below)
NOTE: This will take a while to finish.


Click image for larger version

Name:  Windows_8_Repair_Install_Windows-8B.jpg
Views: 256300
Size:  50.0 KB

Name:  Windows_8_Repair_Install_Windows-9.jpg
Views: 255898
Size:  19.5 KB


17. When Windows 8 is finished installing, select a color you like, and click/tap Next. (see screenshot below)


Click image for larger version


18. Click/tap on Use Express settings. (see screenshot below)


Click image for larger version


19. Do step 20 or 21 below depending on if your primary administrator account is a local account or Microsoft account.


20. If you have a Microsoft Account


A) Go to step 22 below.


21. If you have a Local Account


A) Enter the password for the displayed account, and click/tap on Next. (see screenshot below)

Click image for larger version

B) Click/tap on Skip, and go to step 22 below. (see screenshot below)

Click image for larger version


22. Windows 8 will now startup signed into your administrator account. (see screenshots below)


Click image for larger version

Click image for larger version


23. Use Disk Cleanup to delete at least the Previous Windows installation(s), Setup Log Files, Temporary Windows installation files, and Windows upgrade log files items to free up the large amount hard drive space that they take. (see screenshots below)


Click image for larger version


24. If you have an Enterprise edition or needed to use a generic key to install with from step 10 above, then you will need tochange the product key to be able to enter the product key and activate it. (see screenshots below)


Click image for larger version


25. Check for and install any available Windows Updates.

26. If needed, refresh or update you Windows Experience Index (WEI) score.


Most popular articles 
 
Newest articles